
A pistol optic that shifts under recoil is worse than no optic at all. If you want to know how to mount pistol optic setups correctly, the goal is simple – solid fit, proper torque, and no shortcuts that come back to bite you after a few magazines.
Mounting a red dot on a handgun is not hard, but it is easy to do poorly. A lot of problems blamed on the optic are really mounting problems: the wrong screw length, a plate that does not match the footprint, thread locker used the wrong way, or a slide cut with loose tolerances. Serious shooters care about repeatable zero, reliable cycling, and confidence under pressure. That starts at the interface between the optic and the slide.
Why proper pistol optic mounting matters
On a rifle, you have more room for forgiveness. On a handgun, everything is compact, reciprocating, and taking a beating every time the slide cycles. That means your optic is riding on one of the harshest mounting environments in the firearms world.
A proper mount does three jobs at once. It keeps the optic physically secure, it helps the optic hold zero, and it protects the screws from taking more stress than they should. If the optic is relying only on screws instead of proper recoil bosses or a precise cut, you are already compromising the setup.
This is why direct-milled slides are so popular with experienced Glock owners and serious handgun builders. A tight, purpose-cut optic pocket usually gives you a lower mounting height and better engagement than a generic adapter approach. MOS and plate systems still have their place, especially for flexibility, but they introduce another point where tolerance stacking can cause issues.
How to mount pistol optic without common mistakes
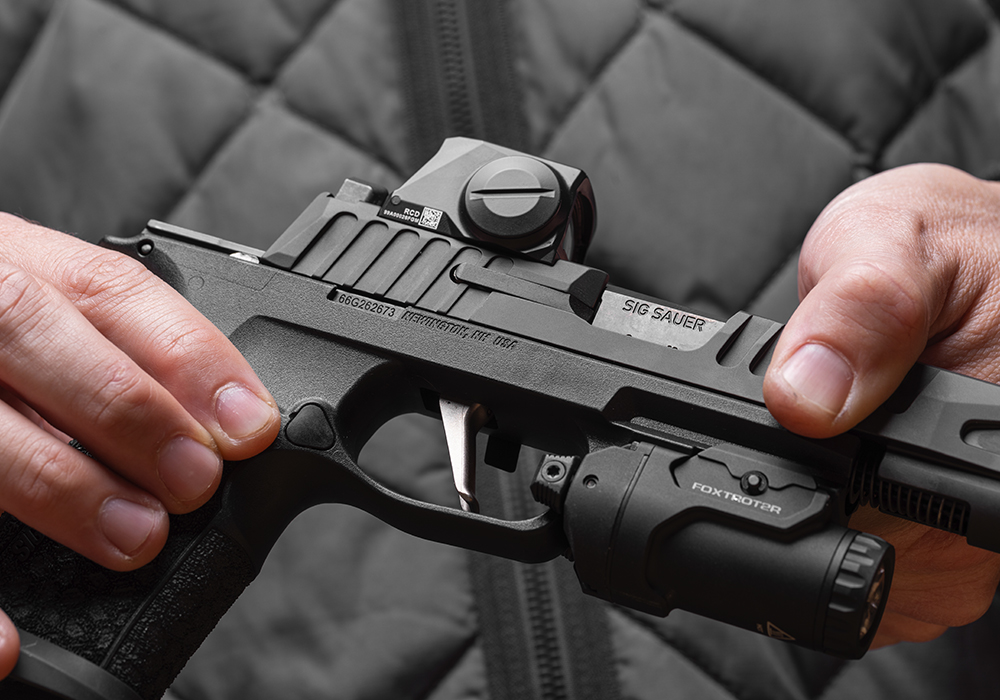
Before you install anything, confirm the footprint. That sounds obvious, but plenty of optics look close enough until the screws bottom out or the recoil lugs do not seat properly. RMR, SRO, Holosun 407C and 507C style footprints are common, but common does not mean universal. RMSc and Shield-pattern optics are different. DeltaPoint Pro is different. ACRO is different.
The next check is your mounting method. You are usually working with one of three setups: a direct-milled slide, a factory MOS-style optics-ready slide with a plate, or a dovetail mount. For a serious carry or duty-oriented build, direct milling or a quality optics-ready system is the stronger choice. Dovetail mounts can work for testing an optic or range experimentation, but they are not the best answer if you want a hard-use gun.
Then inspect the screws. Screw length matters more than a lot of buyers realize. Too short and you lose thread engagement. Too long and the screw can bind against internal slide parts, interfere with the extractor depressor plunger assembly, or prevent the optic from seating all the way down. On some Glock-pattern slides, that margin is very small.
Start with the right slide and optic interface
The best mounting job starts before the screws ever go in. If your slide cut is clean, properly machined, and matched to the optic footprint, the optic should seat with confidence rather than wobbling into place. That is where CNC precision and platform-specific fitment separate premium slides from generic options.
A good direct-milled cut supports the optic with the pocket itself, not just the screws. That reduces shear stress and gives the optic a repeatable home if it ever needs to come off for maintenance. For shooters building out a Glock 19, Glock 17, Glock 43X MOS, or 19X MOS setup, slide quality is not a cosmetic issue – it directly affects mounting stability.
If you are running an MOS-style plate system, inspect both surfaces. The plate should sit flat against the slide, and the optic should sit flat against the plate. Any debris, coating buildup, burr, or tolerance issue between those surfaces can create movement you may not catch until the gun starts losing zero.
Tools and prep that actually matter
You do not need a huge bench setup, but you do need the right basics. A quality torque driver is the big one. Tightening screws by feel is where a lot of bad installs begin. Red dots and mounting screws are not the place for guessing.
You also want a clean work surface, the correct driver bit for the screw head, alcohol or another safe degreaser for threads and mounting surfaces, and the thread locker recommended by the optic or slide manufacturer. The key word is recommended. More is not better.
Oil, grease, and packing residue need to come off the screw threads and screw holes before installation. If the threads are contaminated, thread locker may not cure correctly. If the screw holes are full of oil, torque values become less reliable. A clean install gives you a predictable result.
Use the correct torque spec
There is no single universal torque number for every pistol optic. It depends on the optic, screw size, plate system, and sometimes the slide manufacturer. Always follow the optic maker’s spec first if there is a conflict.
This is one of those areas where “good and tight” is not a professional standard. Under-torque can let the optic walk. Over-torque can strip the threads, deform the screw, damage the optic housing, or create a failure point that shows up later. None of those outcomes are cheap.
Be careful with thread locker
A small amount is enough. You want the screw secured, not flooded. Excess compound can migrate into places it should not be, and if it pools under the optic it can affect seating. Blue thread locker is commonly used for pistol optics, but again, follow the manufacturer’s guidance.
Let it cure. That part gets skipped all the time. If you mount the optic and head straight to the range, you may be testing uncured thread locker instead of a finished install.
Step-by-step mounting process
With the slide unloaded, removed from the frame, and safe to work on, start by cleaning the optic pocket or plate surface, the underside of the optic, the screws, and the threaded holes. Dry everything completely.
Test-fit the optic without thread locker first. It should sit flat with no rocking. If it does rock, stop there and figure out why. Forcing the screws to pull the optic into place is a bad install waiting to fail.
If the optic seats correctly, apply a small amount of thread locker to the screw threads. Set the optic in place and start both screws by hand. Do not crank one side down fully before the other. Bring them down evenly so the optic stays level in the pocket.
Then torque each screw to spec with a proper torque driver. If your setup uses a plate, install and torque the plate according to its instructions before mounting the optic itself. Plate screws and optic screws may use different torque specs, and mixing them up is a common mistake.
After installation, visually inspect the gap between the optic and the slide or plate. You want full contact and even seating. Cycle the slide by hand and confirm there is no interference.
After mounting, prove the setup
A clean install is only half the job. You still need to confirm the optic stays put once recoil enters the picture. After the thread locker has cured, head to the range and zero the optic. Then keep an eye on the screws and witness-mark them if you want a quick visual check.
If your zero drifts immediately, do not assume the optic is defective. Check for movement at the mount first. A loose plate, wrong screws, or poor pocket fit is more common than a quality red dot suddenly failing on day one.
Co-witness height also matters depending on your build. Some shooters want lower-third backup iron visibility, while others prefer a cleaner window and less visual clutter. There is no one right answer. A dedicated carry gun may justify a different setup than a competition pistol built around speed.
When it makes sense to upgrade the slide
Sometimes the best answer is not forcing an optic onto a mediocre mounting solution. If you are building a pistol for carry, range work, or hard-use performance, an optics-ready slide or a properly milled slide is often the smarter move.
That is especially true if you want a lower optic position, improved durability, or cleaner fitment with a specific footprint. A premium slide built around red dot use gives you a better foundation from the start. That means less compromise, fewer fitment headaches, and a setup built to perform under pressure.
For Glock owners who want a trusted destination for optics-ready upgrades, custom cuts, and precision-machined slide options, USGlockSlide.com is built around exactly that kind of performance-focused setup.
The real payoff of mounting a pistol optic the right way is not just a cleaner install. It is the moment the dot tracks the same way every shot, the zero stays where you left it, and the gun feels like one system instead of a pile of parts.